Magnet Closure Box Machine: Specs, Production Planning & Integration Guide 2026
Why Your Magnet Closure Box Machine Specs Matter More Than Price
When shopping for a magnet closure box machine, many buyers fixate on the price tag first. That is a mistake. The real question is whether the machine’s specifications match your production reality — box sizes, daily output targets, board thickness, magnet dimensions, and integration with existing equipment. A cheaper machine that cannot handle your largest box format or produces inconsistent magnet alignment will cost far more in rejects and downtime than the savings on the purchase price.
This guide takes a specification-first approach. We break down every critical parameter you need to evaluate before investing in a magnet closure box machine, provide a practical production planning framework, and explain how to integrate magnetic closure capability into your existing rigid box production line — whether you are upgrading a semi-automatic setup or adding fully automatic capacity.
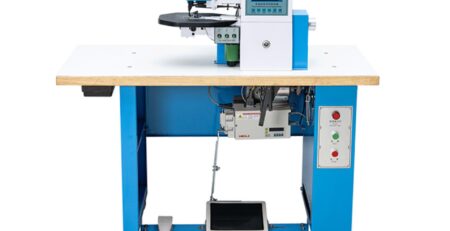
How a Magnet Closure Box Machine Works: The 4-Stage Process
Understanding the production sequence is essential before comparing specifications. Every magnet closure box machine — regardless of automation level — follows four core stages:
Stage 1: Magnet Separation
Neodymium magnets are powerful and notoriously difficult to handle in bulk. They clump together into an inseparable mass. A magnet separator feeds individual magnets one-by-one to the insertion mechanism — or to an operator in semi-automatic setups. Without a reliable separator, magnet handling becomes the biggest bottleneck on your line.
Stage 2: Cavity Milling
CNC-grade milling spindles cut precise recesses into the greyboard at programmed positions. Depth control is critical here — the cavity must be exactly deep enough for the magnet to sit flush with the board surface. Too shallow and the magnet protrudes; too deep and the closure feels weak.
Stage 3: Glue Dispensing & Magnet Insertion
A micro-dosing glue system injects a precise amount of adhesive into each cavity, then the magnet (or metal plate) is pressed into position. The best machines use servo-driven insertion with polarity sensors to ensure no magnet is inserted upside down — a common defect in manual assembly that leads to boxes that repel instead of attract.
Stage 4: Board Transfer to Box Forming
Once magnets are embedded, the prepared boards feed into your standard rigid box production workflow — wrapping, corner taping, and final forming on machines like the KY-550C rigid box forming machine.
Critical Specifications: What Every Buyer Must Check
When comparing magnet closure box machines from different manufacturers, do not rely on marketing brochures alone. Request the full specification sheet and verify these 8 parameters:
1. Board Size Range (Min & Max)
This is the single most important spec. Your machine must accommodate your full range of box formats. If you produce small jewelry boxes (100 × 60 mm) and large gift boxes (500 × 400 mm), make sure the machine handles both extremes. Machines with dual-path capability often split the board size into two configurations — single-path for oversized boards and dual-path for smaller formats at double throughput.
2. Board Thickness Tolerance
Greyboard thickness directly affects milling depth accuracy. Most magnet closure box machines handle 1–3 mm board thickness, but verify this against your actual material. Book-style rigid boxes frequently use 2.5–3 mm board, and jamming or inconsistent milling at the upper limit is a common complaint with entry-level machines.
3. Magnet Size Compatibility
Magnet specifications vary by box size and closure force requirements. The machine should support round magnets from 8 mm to 20 mm diameter and square/rectangular magnets from 10×6 mm to 20×15 mm. If you serve multiple industries, flexible magnet size support eliminates the need for separate equipment per product line.
4. Placement Accuracy
Look for ±0.2 mm placement accuracy. Anything looser than ±0.3 mm will produce visible misalignment when the lid and base magnets meet. This is especially critical for cosmetic and jewelry boxes where the closure must feel seamless and premium. Machines using vision-guided or servo-driven positioning consistently outperform pneumatic alternatives on accuracy.
5. Production Speed
Speed is typically measured in pieces per minute (pcs/min). A single-path semi-automatic setup might produce 15–25 pcs/min, while fully automatic dual-path machines reach 50–80 pcs/min. Match the speed to your actual order volume — over-investing in speed you will never use is as wasteful as under-investing and creating a bottleneck.
6. Glue System Type
Hot-melt glue systems offer faster curing and are standard on high-speed machines. Cold glue (PVA) systems provide stronger long-term bonds and are preferred for heavy boxes or humid environments. Verify that the dosing system is micro-adjustable — excessive glue spills over the cavity edge and stains the wrapping paper.
7. Magnet Separation Speed
If you are using a standalone magnet separator (essential for semi-automatic setups), the separator speed must match or exceed your insertion rate. A separator delivering 60 pcs/min comfortably feeds one operator; a fully automatic line may require integrated high-speed feeding at 80+ pcs/min.
8. Changeover Time
If you produce multiple box sizes per shift, changeover time matters more than top speed. Ask manufacturers about the exact changeover procedure. Machines with recipe storage on the PLC touch panel allow operators to recall saved programs for each product — reducing changeover from 30 minutes to under 5 minutes.
Specification Comparison Table
Use this reference table when evaluating magnet closure box machines. These are the benchmarks for a production-grade machine suitable for commercial rigid box manufacturing:
| Specification | Entry-Level (Semi-Auto) | Professional (Full Auto Single-Path) | High-Volume (Full Auto Dual-Path) |
|---|---|---|---|
| Max Board Size | 500 × 400 mm | 850 × 650 mm | 1210 × 650 mm (single path) |
| Min Board Size | 150 × 100 mm | 120 × 80 mm | 100 × 60 mm |
| Board Thickness | 1–2 mm | 1–3 mm | 1–3 mm |
| Placement Accuracy | ±0.5 mm | ±0.3 mm | ±0.2 mm |
| Production Speed | 15–25 pcs/min | 25–40 pcs/min | 50–80 pcs/min |
| Magnet Sizes (Round) | Φ8–15 mm | Φ8–20 mm | Φ8–20 mm |
| Magnet Sizes (Square) | 10×6–15×10 mm | 10×6–20×15 mm | 10×6–20×15 mm |
| Changeover Time | 15–30 min | 5–15 min | 3–8 min (recipe-based) |
| Operator Requirement | 2–3 operators | 1–2 operators | 1 operator |
| Typical Investment | USD 15,000–40,000 | USD 60,000–90,000 | USD 100,000–150,000 |
| Best For | Short runs, custom orders | Mid-volume dedicated line | High-volume standardized production |
Production Planning: Calculate Your Daily Capacity
Use this formula to determine the machine speed you actually need:
Required Speed (pcs/min) = Daily Target Output ÷ (Operating Hours × 60 × Efficiency Rate)
Where the efficiency rate accounts for changeovers, maintenance, and breaks. A realistic efficiency rate for rigid box production is 75–80%.
Example: You need 5,000 magnet closure boxes per day, with 8 operating hours and 80% efficiency:
5,000 ÷ (8 × 60 × 0.80) = 5,000 ÷ 384 = 13 pcs/min minimum required
With this calculation, even a semi-automatic setup rated at 15–20 pcs/min would meet your needs — there is no need to invest in an 80 pcs/min dual-path machine. However, if your target is 15,000 boxes per day, the math pushes you to 39 pcs/min, which requires a fully automatic single-path or dual-path configuration.
Magnet Separator: The Overlooked Bottleneck
Whether you run semi-automatic or fully automatic magnet insertion, a magnet separator is essential. Neodymium magnets — typically 3–20 mm in diameter — cannot be efficiently separated by hand. Attempting to do so risks finger injury, magnet damage, and severe production slowdowns.
A compact magnet separator like the Kylin KY-20A handles magnets from 3–20 mm diameter at up to 60 pcs/min, weighs just 2.5 kg, and sits on any workbench. It feeds individual magnets to your operator or to the automatic insertion mechanism, eliminating the #1 manual handling bottleneck in magnet closure box production.
| Specification | KY-20A Magnet Separator |
|---|---|
| Magnet Diameter Range | 3–20 mm |
| Magnet Thickness | Up to 10 mm |
| Separation Speed | Up to 60 pcs/min |
| Magnet Shapes Supported | Round & square/rectangular |
| Dimensions | 230 × 160 × 170 mm |
| Weight | 2.5 kg |
Integration: Adding Magnet Capability to Your Existing Line
You do not necessarily need a standalone magnet closure box machine if you already operate a rigid box production line. There are two integration paths:
Option A: Standalone Magnet Insertion Machine + Existing Box Former
Add a dedicated magnet insertion machine before your existing box forming machine. The insertion machine mills cavities and embeds magnets into flat greyboard. Operators then feed the prepared boards into your existing forming line. This modular approach preserves your current investment and adds magnetic capability without replacing entire equipment.
Option B: Fully Integrated Magnet Closure Line
Replace or build a new line where magnet insertion, wrapping, corner taping, and forming happen sequentially on a connected production line. This is the highest-efficiency option for factories where magnetic closure boxes are the primary product. Kylin Machine’s KY-1265A Fully Auto Magnet Closure Box Machine integrates all stages with dual-path throughput at 80 pcs/min and ±0.2 mm accuracy.
ROI Calculation: When Does Automation Pay Off?
Here is a practical ROI framework for justifying a magnet closure box machine investment:
- Manual labor cost per box: Calculate how much you currently spend on manual magnet insertion. Typically, one skilled worker inserts 40–60 magnets per hour. At an hourly labor cost of USD 5–8 (depending on location), each box with 4 magnets costs USD 0.33–0.80 in labor alone.
- Reject rate savings: Manual insertion has a 5–10% defect rate from misalignment and wrong polarity. At USD 1.50–3.00 material cost per box, reducing rejects from 8% to under 1% saves USD 0.10–0.20 per box.
- Throughput increase: Automating magnet insertion typically increases daily output by 3–10× compared to manual methods, depending on machine tier.
- Payback period formula: Machine Cost ÷ (Labor Savings + Reject Savings per Day × Operating Days per Year)
Example: A USD 35,000 semi-automatic line saves USD 200/day in labor and USD 60/day in reject reduction across 250 operating days. Payback = 35,000 ÷ (260 × 250) = 6.5 months.
FAQ: Magnet Closure Box Machines
Can I use my existing rigid box forming machine for magnet closure boxes?
Yes. A standard rigid box forming machine like the KY-550C handles magnet closure boxes without modification. The key is adding magnet insertion capability upstream — either via a standalone magnet insertion machine or a manual magnet insertion station with a magnet separator. The forming, wrapping, and corner taping processes remain identical to standard rigid boxes.
What magnet sizes do I need for my box dimensions?
Small jewelry boxes (under 150 mm) typically use 8–10 mm round magnets. Mid-size cosmetic and eyewear boxes (150–300 mm) use 10–15 mm magnets. Large gift and wine boxes (over 300 mm) require 15–20 mm magnets or pairs of magnets for adequate closure force. Always test with your actual board thickness and wrapping paper weight before committing to a magnet specification.
How do I prevent magnets from being inserted with reversed polarity?
Professional-grade machines include automatic polarity sensors that check each magnet’s orientation before insertion. If a magnet is upside down, the system rejects it and feeds the next one. For semi-automatic operations, a magnet separator with a polarity alignment feature ensures all magnets exit the separator in the same orientation.
What is the maintenance schedule for a magnet closure box machine?
Daily: clean magnet dust and glue residue from the milling area and insertion head. Weekly: check and calibrate milling depth, inspect glue nozzles for clogging. Monthly: lubricate linear rails and check belt tension on the feeding system. Quarterly: full calibration of placement accuracy using a test board. Most manufacturers include remote training and maintenance guidance as part of the purchase package.
Key Takeaways
- Specifications beat price. A machine that cannot handle your largest board size or thickest greyboard is worthless regardless of cost.
- Calculate your required speed using the daily output formula before talking to suppliers — this prevents overpaying for unneeded capacity or under-buying and creating a bottleneck.
- Do not overlook the magnet separator. It is the difference between a smooth production line and a magnet-handling nightmare.
- Consider modular integration. Adding a standalone magnet insertion machine to your existing box forming line is often more cost-effective than buying a fully integrated system.
- Verify placement accuracy. ±0.2 mm is the benchmark for premium magnetic closure boxes. Anything less will show in the final product.
Next Steps
Kylin Machine has supplied magnet closure box production equipment to over 10,000 customers across 30+ countries. Whether you need a compact magnet separator for semi-automatic production or a high-speed dual-path insertion machine for fully automatic lines, we provide factory-direct pricing, 36-month warranty, and lifetime technical support.
Contact us today for a free production consultation and machine quotation. Reach our team directly on WhatsApp at +86-13809820550 or visit our machine catalog at kylinmachines.com/Machine to browse our full range of rigid box production equipment.
Published June 2026. All specifications and prices are subject to verification. Request a formal quotation for current pricing and availability.

Leave a Reply